Importing a GPX file
-
As a longtime Garmin Basecamp user, I sometimes have an issue understanding the way MRA Routeplanner works. When using Basecamp, if I import a GPX file into a folder, I will see in that folder the Waypoints (or POIs), Routes and Tracks. provided each type exists.
Within the MRA Routeplanner, is it possible to do something similar in one step? Or do I need to do this in three separate steps? ie- Import Route
- Import Track
- POI --> Library --> Add
-
Yes, if you need the route as well as the track or POI when those are available in the GPX, it will be separate steps indeed. They also remain separate items after import (not linked to each other).
-
The issue really isn't "need", but not knowing what is actually in the GPX file. So, if someone sends you a GPX file or maybe you download a GPX file from a link provided in a magazine article or a website, as a "best practices", one needs to actually execute the above three steps in post 1 when one isn't aware what actually is in the GPX file?
-
Indeed, it currently is "trial and error".
-
The issue really isn't "need", but not knowing what is actually in the GPX file. So, if someone sends you a GPX file or maybe you download a GPX file from a link provided in a magazine article or a website, as a "best practices", one needs to actually execute the above three steps in post 1 when one isn't aware what actually is in the GPX file?
@Brett-Bartick said in Importing a GPX file:
The issue really isn't "need", but not knowing what is actually in the GPX file.
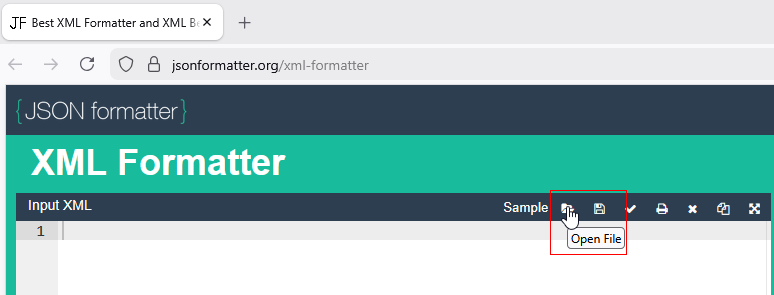
You can see the contents of a GPX file without having to load it into MRA. This will also allow you to understand the internal structure of the file and perhaps, why things work they way they do. The internal format of a GPX file is basically XML so you can use an XML formatter to easily see what's inside. I use https://jsonformatter.org/xml-formatter which is one of the options from the https://codebeautify.org/ site.
On the formatter, use the Open File option, then navigate to and select your GPX file:
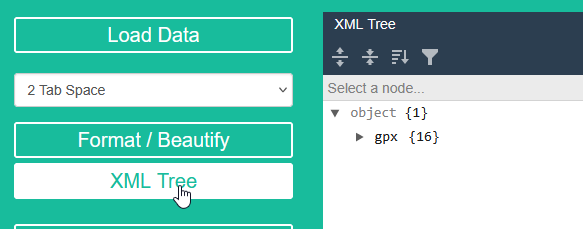
The input XML is shown on the left side panel and a formatted view is on the right. You can scroll up and down that if you wish but it can help further if you use the XML Tree function which will give you a collapsed view of the file:
You can then use the expand/collapse arrows to gradually expand the elements to see what is there.
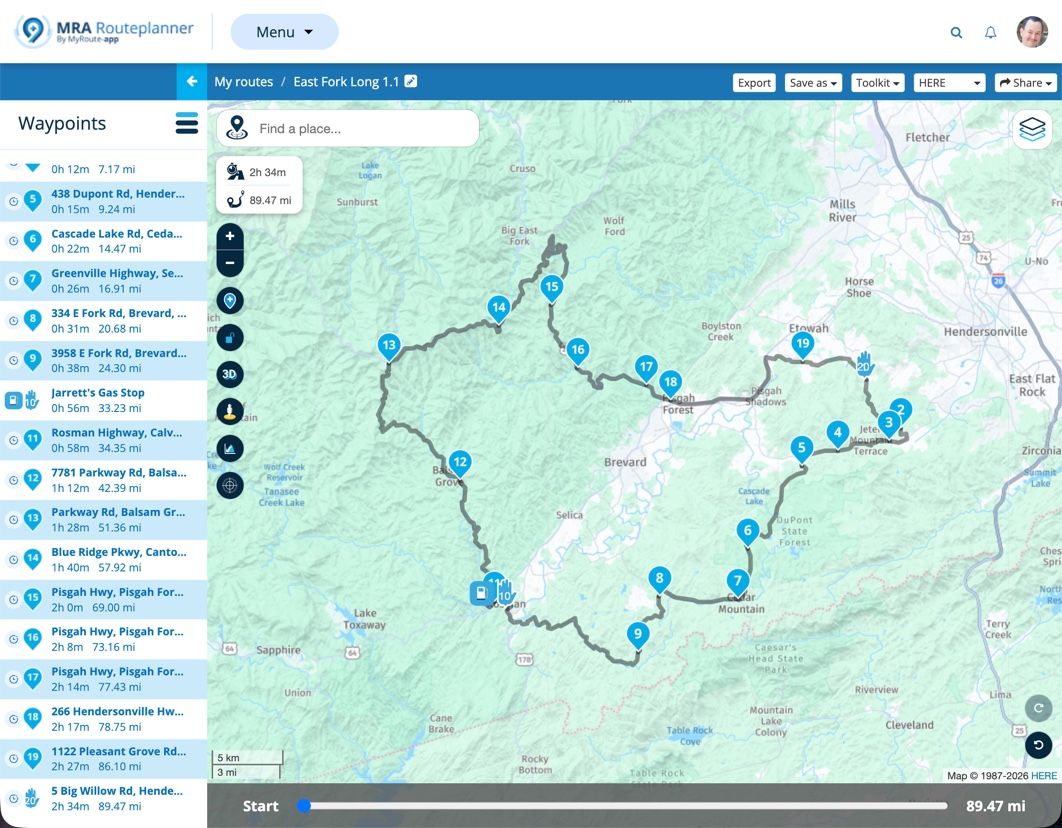
I created a small sample route that has three route points, 2 via points (hand symbols) at the start and end of the route and one shaping point (number 2) part way along. I have also added two POI fuel stations and given them names which can been seen when you hover a mouse pointer over them.
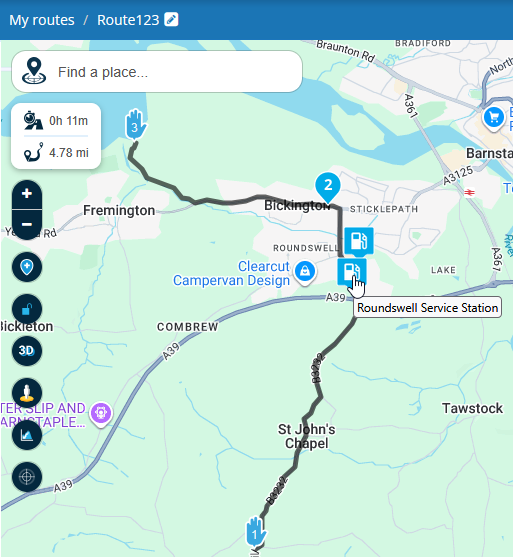
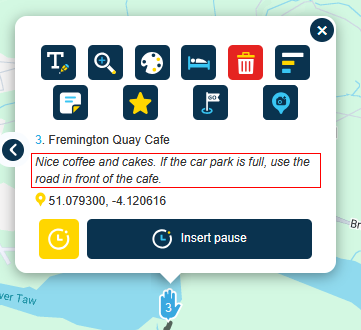
I added a note to the final point (number 3) which can be seen on when you click on that point:
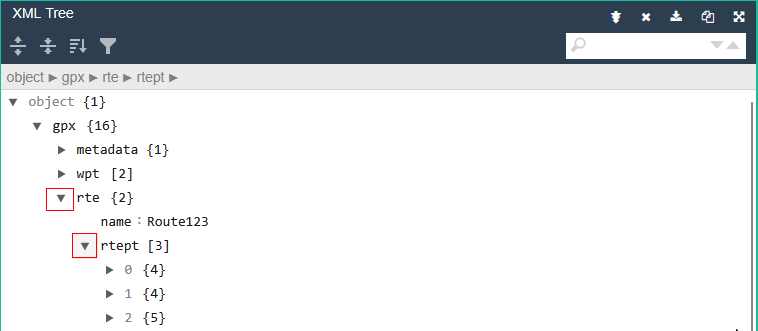
Going back to the XML tree, we can see that in this example there are 16 items under gpx. If we click the arrow to expand it, we see:
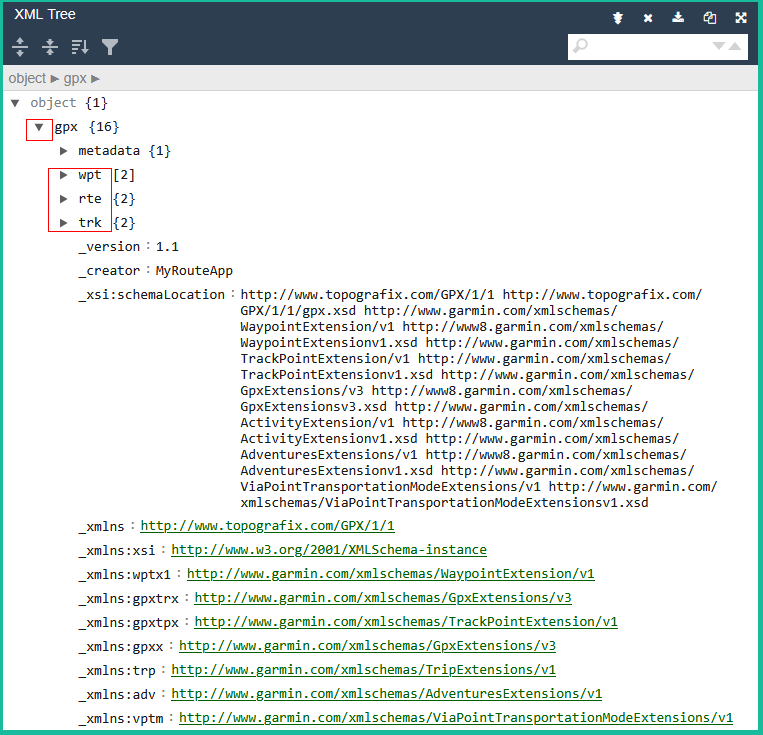
The metadata element contains the date and time the route was saved (not shown here) but probably the most interesting elements are the next three which are wpt, rte and trk.
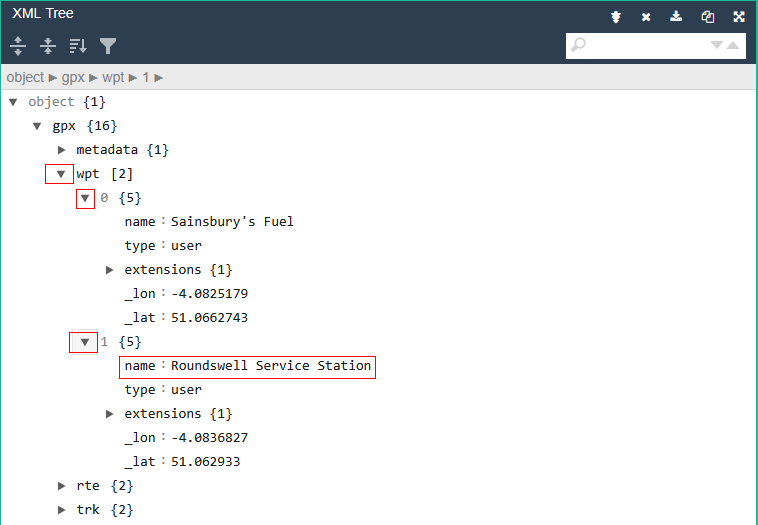
The wpt elements contain the POI details that were added to the route including the lat & long coordinates and the names given to those points:
The rte element contains the route name plus a rtept (Route Point) element for each point on the route. In this case there are 3, and they are numbered 0, 1 and 2.
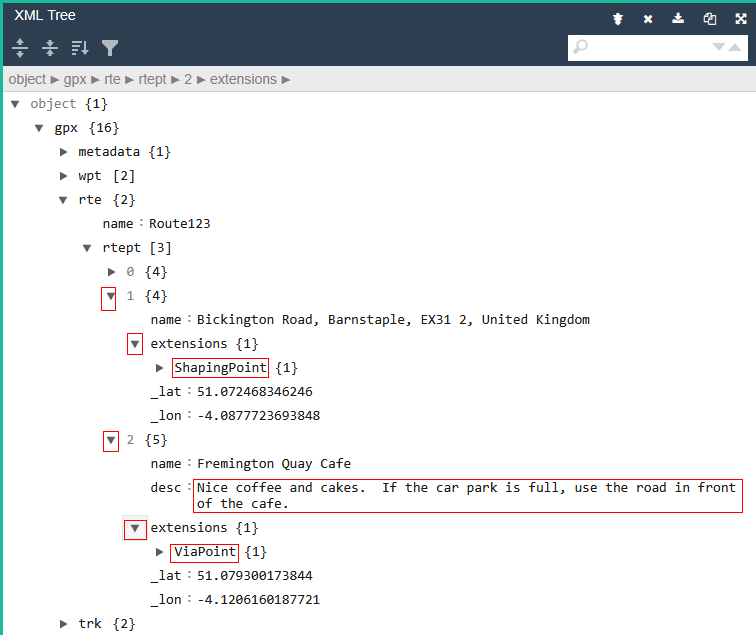
The following image shows expanded route points 1 and 2 plus the extensions element within each of those. We can see the name plus lat & long coordinates for each point. We can also see if the point is defined as a ShapingPoint or ViaPoint. The note that was added to the final point is also shown and MRA Navigation can read that out to you as you approach it (other navigation devices also have this capability).
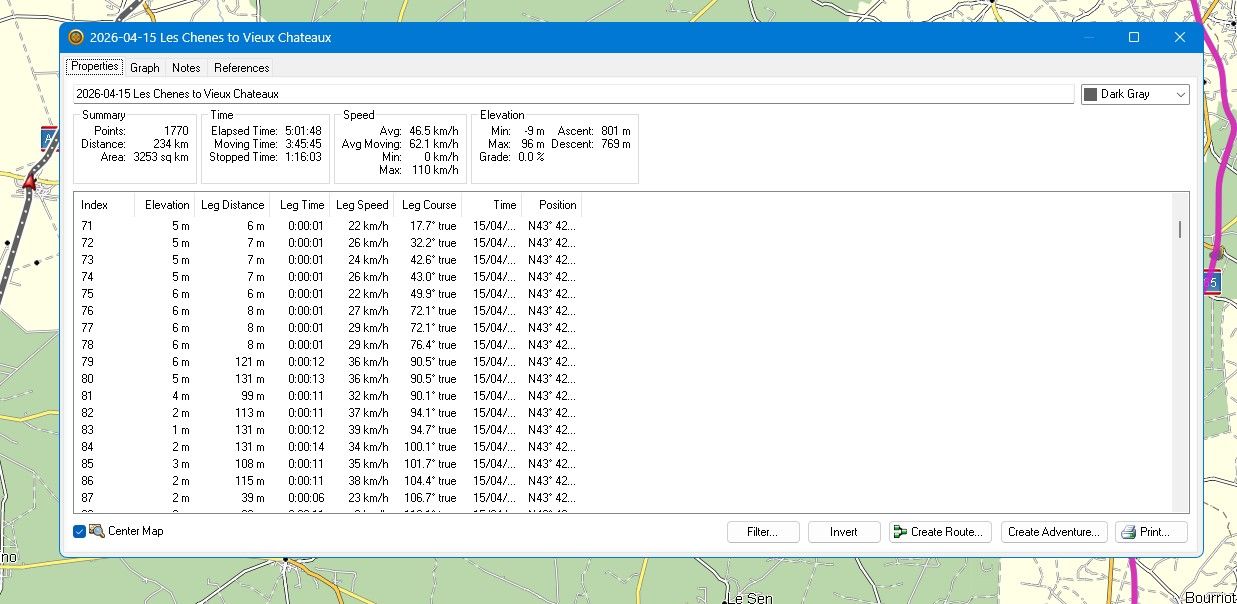
The trk element contains the track name and the track segment of the file. Expanding the trkseg element shows that there are 274 track points in this example route that is less than 5 miles long. Each trkpt is a lat & long coordinate from a point on the line shown on the map when you view your route.
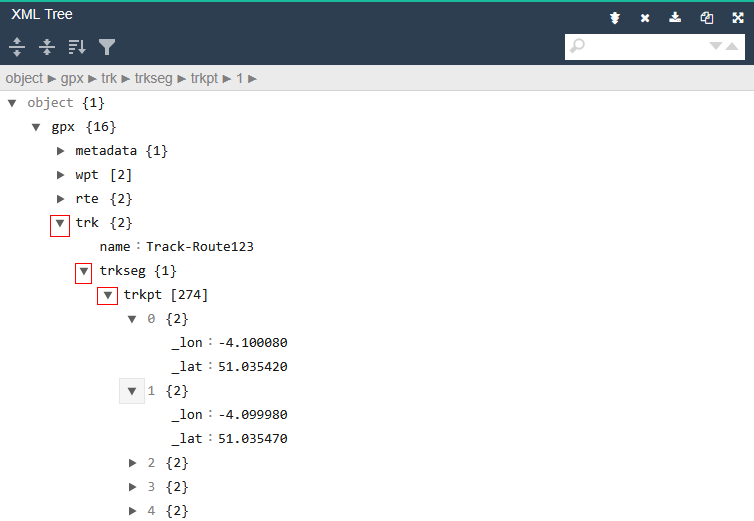
The distance between each trkpt can be measured in tens of metres/yards so for a long route, there can be thousands of them.
Hope that helps.
-
@Brett-Bartick said in Importing a GPX file:
The issue really isn't "need", but not knowing what is actually in the GPX file.
You can see the contents of a GPX file without having to load it into MRA. This will also allow you to understand the internal structure of the file and perhaps, why things work they way they do. The internal format of a GPX file is basically XML so you can use an XML formatter to easily see what's inside. I use https://jsonformatter.org/xml-formatter which is one of the options from the https://codebeautify.org/ site.
On the formatter, use the Open File option, then navigate to and select your GPX file:
The input XML is shown on the left side panel and a formatted view is on the right. You can scroll up and down that if you wish but it can help further if you use the XML Tree function which will give you a collapsed view of the file:
You can then use the expand/collapse arrows to gradually expand the elements to see what is there.
I created a small sample route that has three route points, 2 via points (hand symbols) at the start and end of the route and one shaping point (number 2) part way along. I have also added two POI fuel stations and given them names which can been seen when you hover a mouse pointer over them.
I added a note to the final point (number 3) which can be seen on when you click on that point:
Going back to the XML tree, we can see that in this example there are 16 items under gpx. If we click the arrow to expand it, we see:
The metadata element contains the date and time the route was saved (not shown here) but probably the most interesting elements are the next three which are wpt, rte and trk.
The wpt elements contain the POI details that were added to the route including the lat & long coordinates and the names given to those points:
The rte element contains the route name plus a rtept (Route Point) element for each point on the route. In this case there are 3, and they are numbered 0, 1 and 2.
The following image shows expanded route points 1 and 2 plus the extensions element within each of those. We can see the name plus lat & long coordinates for each point. We can also see if the point is defined as a ShapingPoint or ViaPoint. The note that was added to the final point is also shown and MRA Navigation can read that out to you as you approach it (other navigation devices also have this capability).
The trk element contains the track name and the track segment of the file. Expanding the trkseg element shows that there are 274 track points in this example route that is less than 5 miles long. Each trkpt is a lat & long coordinate from a point on the line shown on the map when you view your route.
The distance between each trkpt can be measured in tens of metres/yards so for a long route, there can be thousands of them.
Hope that helps.
@Andy-W Great advice and explanation, but nevermind that, you're making demo routes in my manor!

-
@Brett-Bartick said in Importing a GPX file:
The issue really isn't "need", but not knowing what is actually in the GPX file.
You can see the contents of a GPX file without having to load it into MRA. This will also allow you to understand the internal structure of the file and perhaps, why things work they way they do. The internal format of a GPX file is basically XML so you can use an XML formatter to easily see what's inside. I use https://jsonformatter.org/xml-formatter which is one of the options from the https://codebeautify.org/ site.
On the formatter, use the Open File option, then navigate to and select your GPX file:
The input XML is shown on the left side panel and a formatted view is on the right. You can scroll up and down that if you wish but it can help further if you use the XML Tree function which will give you a collapsed view of the file:
You can then use the expand/collapse arrows to gradually expand the elements to see what is there.
I created a small sample route that has three route points, 2 via points (hand symbols) at the start and end of the route and one shaping point (number 2) part way along. I have also added two POI fuel stations and given them names which can been seen when you hover a mouse pointer over them.
I added a note to the final point (number 3) which can be seen on when you click on that point:
Going back to the XML tree, we can see that in this example there are 16 items under gpx. If we click the arrow to expand it, we see:
The metadata element contains the date and time the route was saved (not shown here) but probably the most interesting elements are the next three which are wpt, rte and trk.
The wpt elements contain the POI details that were added to the route including the lat & long coordinates and the names given to those points:
The rte element contains the route name plus a rtept (Route Point) element for each point on the route. In this case there are 3, and they are numbered 0, 1 and 2.
The following image shows expanded route points 1 and 2 plus the extensions element within each of those. We can see the name plus lat & long coordinates for each point. We can also see if the point is defined as a ShapingPoint or ViaPoint. The note that was added to the final point is also shown and MRA Navigation can read that out to you as you approach it (other navigation devices also have this capability).
The trk element contains the track name and the track segment of the file. Expanding the trkseg element shows that there are 274 track points in this example route that is less than 5 miles long. Each trkpt is a lat & long coordinate from a point on the line shown on the map when you view your route.
The distance between each trkpt can be measured in tens of metres/yards so for a long route, there can be thousands of them.
Hope that helps.
@Andy-W wow, what an answer for a easy question! Rspect

I would call it extra teaching lesson
-
@Brett-Bartick said in Importing a GPX file:
The issue really isn't "need", but not knowing what is actually in the GPX file.
You can see the contents of a GPX file without having to load it into MRA. This will also allow you to understand the internal structure of the file and perhaps, why things work they way they do. The internal format of a GPX file is basically XML so you can use an XML formatter to easily see what's inside. I use https://jsonformatter.org/xml-formatter which is one of the options from the https://codebeautify.org/ site.
On the formatter, use the Open File option, then navigate to and select your GPX file:
The input XML is shown on the left side panel and a formatted view is on the right. You can scroll up and down that if you wish but it can help further if you use the XML Tree function which will give you a collapsed view of the file:
You can then use the expand/collapse arrows to gradually expand the elements to see what is there.
I created a small sample route that has three route points, 2 via points (hand symbols) at the start and end of the route and one shaping point (number 2) part way along. I have also added two POI fuel stations and given them names which can been seen when you hover a mouse pointer over them.
I added a note to the final point (number 3) which can be seen on when you click on that point:
Going back to the XML tree, we can see that in this example there are 16 items under gpx. If we click the arrow to expand it, we see:
The metadata element contains the date and time the route was saved (not shown here) but probably the most interesting elements are the next three which are wpt, rte and trk.
The wpt elements contain the POI details that were added to the route including the lat & long coordinates and the names given to those points:
The rte element contains the route name plus a rtept (Route Point) element for each point on the route. In this case there are 3, and they are numbered 0, 1 and 2.
The following image shows expanded route points 1 and 2 plus the extensions element within each of those. We can see the name plus lat & long coordinates for each point. We can also see if the point is defined as a ShapingPoint or ViaPoint. The note that was added to the final point is also shown and MRA Navigation can read that out to you as you approach it (other navigation devices also have this capability).
The trk element contains the track name and the track segment of the file. Expanding the trkseg element shows that there are 274 track points in this example route that is less than 5 miles long. Each trkpt is a lat & long coordinate from a point on the line shown on the map when you view your route.
The distance between each trkpt can be measured in tens of metres/yards so for a long route, there can be thousands of them.
Hope that helps.
@Andy-W Yes, this helps!
Thank you very much. -
Thank you for this derivation and explanation
-
 undefined Andy W referenced this topic on
Hello! It looks like you're interested in this conversation, but you don't have an account yet.
Getting fed up of having to scroll through the same posts each visit? When you register for an account, you'll always come back to exactly where you were before, and choose to be notified of new replies (either via email, or push notification). You'll also be able to save bookmarks and upvote posts to show your appreciation to other community members.
With your input, this post could be even better 💗
Register Login-
-113121
-
0668
-
0683
-
0550
-
0458
-
05189
-
718891
-
071.2k